
These ideas run from a pegboard over your workbench to a crate tower that uses floor space you already have, and the one that fits your shed depends on whether you need quick access during a project or long-term storage that stays clean through seasons.
A pegboard over your workbench keeps hand tools visible and within reach, but that only helps if the wall behind it can take the weight without anchors pulling through thin backing.
1. Pegboards
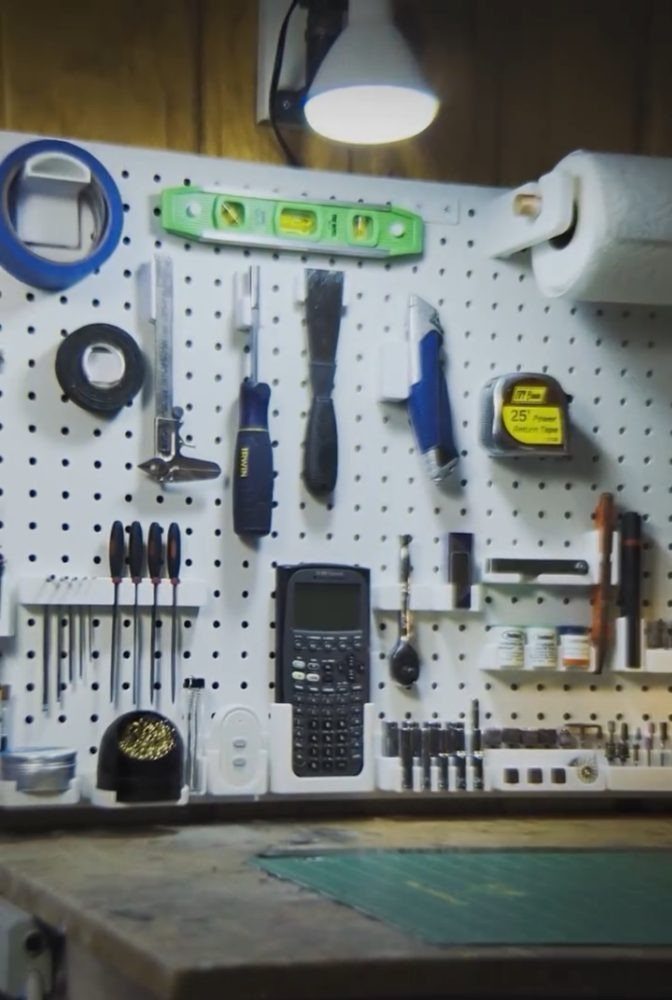
A pegboard turns any open wall into a layout you can rearrange without drilling new holes each time.
I like the white steel kind over a workbench because it reflects light back onto what you’re holding, and the holes fit standard hooks from any hardware store.
Before you mount one, check that your wall can take the weight; particle board or thin plywood backing needs anchors, not just screws. I skip the framed versions for sheds, the lip wastes space where every inch counts.

Value Package: Our pegboard tool organizer comes with 120pcs pegboard accessories,16 different type pegboard hooks including 5pcs pegboard bins, curved hooks, angled hooks, straight hooks, and ring tool holder, multi tool rack. 49pcs of them are peg locks for fixing hooks

Value Package: Our pegboard tool organizer comes with 278pcs pegboard accessories, 16 different type pegboard hooks including 12pcs peg board bins, curved hooks, angled hooks, straight hooks, and ring tool holder, multi tool rack. 109pcs of them are peg locks for fixing hooks

PREMIUM QUALITY MATERIAL - Made from heavy-duty hardened steel, these pegboard hooks are built for strength and longevity. With a galvanized finish, they resist wear and tear, ensuring your hooks stay in top condition for years, even with frequent use.
2. Wall-Mounted Shelves

Custom wooden wall shelves for power tools work best when each drill or charger gets its own slot, so you grab without looking.
Light wood against a light wall keeps the visual noise down; I would stain darker in a dusty shop where grime shows fast.
What I’d check before building: whether your heaviest tool needs a back lip or a full cradle, and whether battery chargers need ventilation or can sit in a closed cubby. Cord management is the detail that separates usable from frustrating.

High-Quality Metal Materials: Our tool holder is constructed from heavy industrial-grade steel. It is resistant to rust and corrosion, scratch-resistant, durable, and smooth. Each edge of the metal plates is polished to ensure a smooth finish, preventing any scratches to your fingers. The upgraded welding points and coating help prevent deformation while enhancing strength and longevity.

【Multi-Functional Garage Wall Organizer】This power tool holder utilizes free wall space to store tools items, comes with charging station, 4 drill holder slots, 4 hooks and drill bit rack, 2 layers adjustable structure can place the charge tools in order, providing you a neat and efficient workbench!

4-Outlet Power Strip:This garage shelf wall mount features an integrated 4-outlet power strip with a 6.5-foot cord for easy charging. Charge your tools directly on the shelf without the hassle of searching for outlets. By combining storage and functionality, this tool rack saves space while ensuring your power tools are always ready for use.
3. Tool Hangers
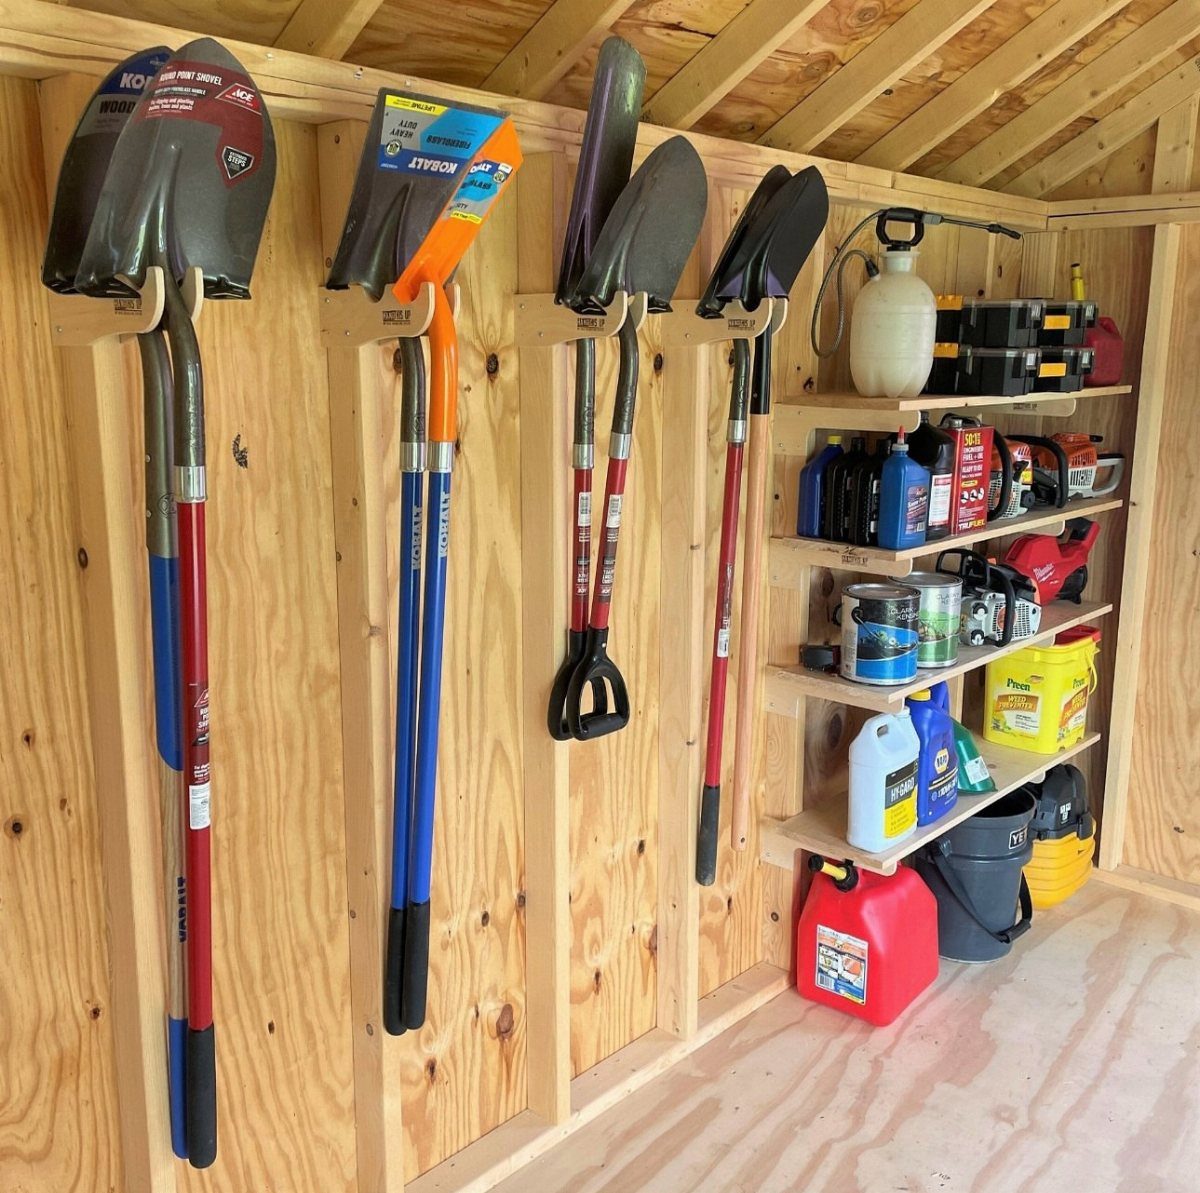
Wall-mounted brackets for long-handled tools keep floor space clear and blades out of the dirt. I prefer the angled kind that hold a shovel at 2 points; single hooks let handles swing and wall paint suffers.
Mixing those brackets with built-in shelves for gas and oil is a smart move that keeps fluids off the floor.
Chemicals stay low, long tools stay high, and you’re not lifting a spade over a gas can every time. Check that your wall studs line up with bracket spacing, or plan a horizontal backer board.

HEAVY-DUTY ABS MATERIAL : This adjustable storage system is constructed from high-quality, heavy-duty ABS material, delivering excellent durability and long-lasting performance. Designed to withstand daily garage and garden use, it provides reliable support for organizing a wide range of household and outdoor tools.

💪Material - The mop holder is made of high quality stainless steel, Much strong and sturdy than plastic holder. Build to resist daily scratches, corrosion and tarnishing. Allowing it to remain looking its best for longer.

MULTIPLE STORAGE OPTIONS: Features 5 slots and 6 hooks supporting up to 7.5 pounds per slot, perfect for organizing various cleaning tools efficiently
4. Overhead Storage
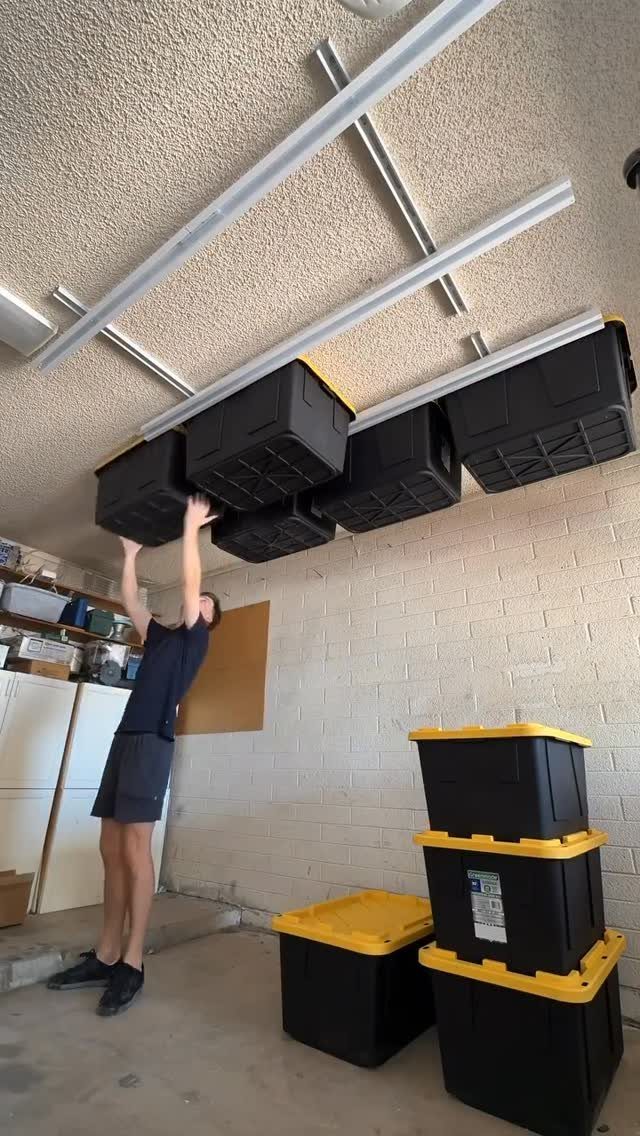
Ceiling rails with sliding totes eat up space that otherwise goes empty, but they only work where the ceiling is high enough to walk under a loaded bin.
I leave enough headroom to walk beneath the rail comfortably, and measure with the tote itself, not the track.
I like that they nest when empty but the lids seal tight enough for seasonal storage. Install the track into joists, not drywall, and check load ratings; I halve the listed capacity for anything I walk beneath.

USA BASED & FAMILY OWNED - Our patent pending handy connectable garage ceiling storage racks design was invented by father and son tradesmen looking for a handy way to unlock more storage. The rails allow you to connect as many together as you can fit in your garage, shed, or workshop space.

CEILING MOUNT SPACE SAVER: Reclaim your valuable garage floor space. This overhead hanging rail system cleverly utilizes unused ceiling areas to neatly suspend your seasonal items, heavy tools, and holiday decor. Instantly transform a cluttered workspace into a highly organized, professional environment.

Declutter Your Garage: Our overhead bin storage rack keeps items off the floor and protected. Help to organize your garage and free up floor space. Conveniently store gear overhead with ceiling tote storage rails
5. DIY Rolling Workbench
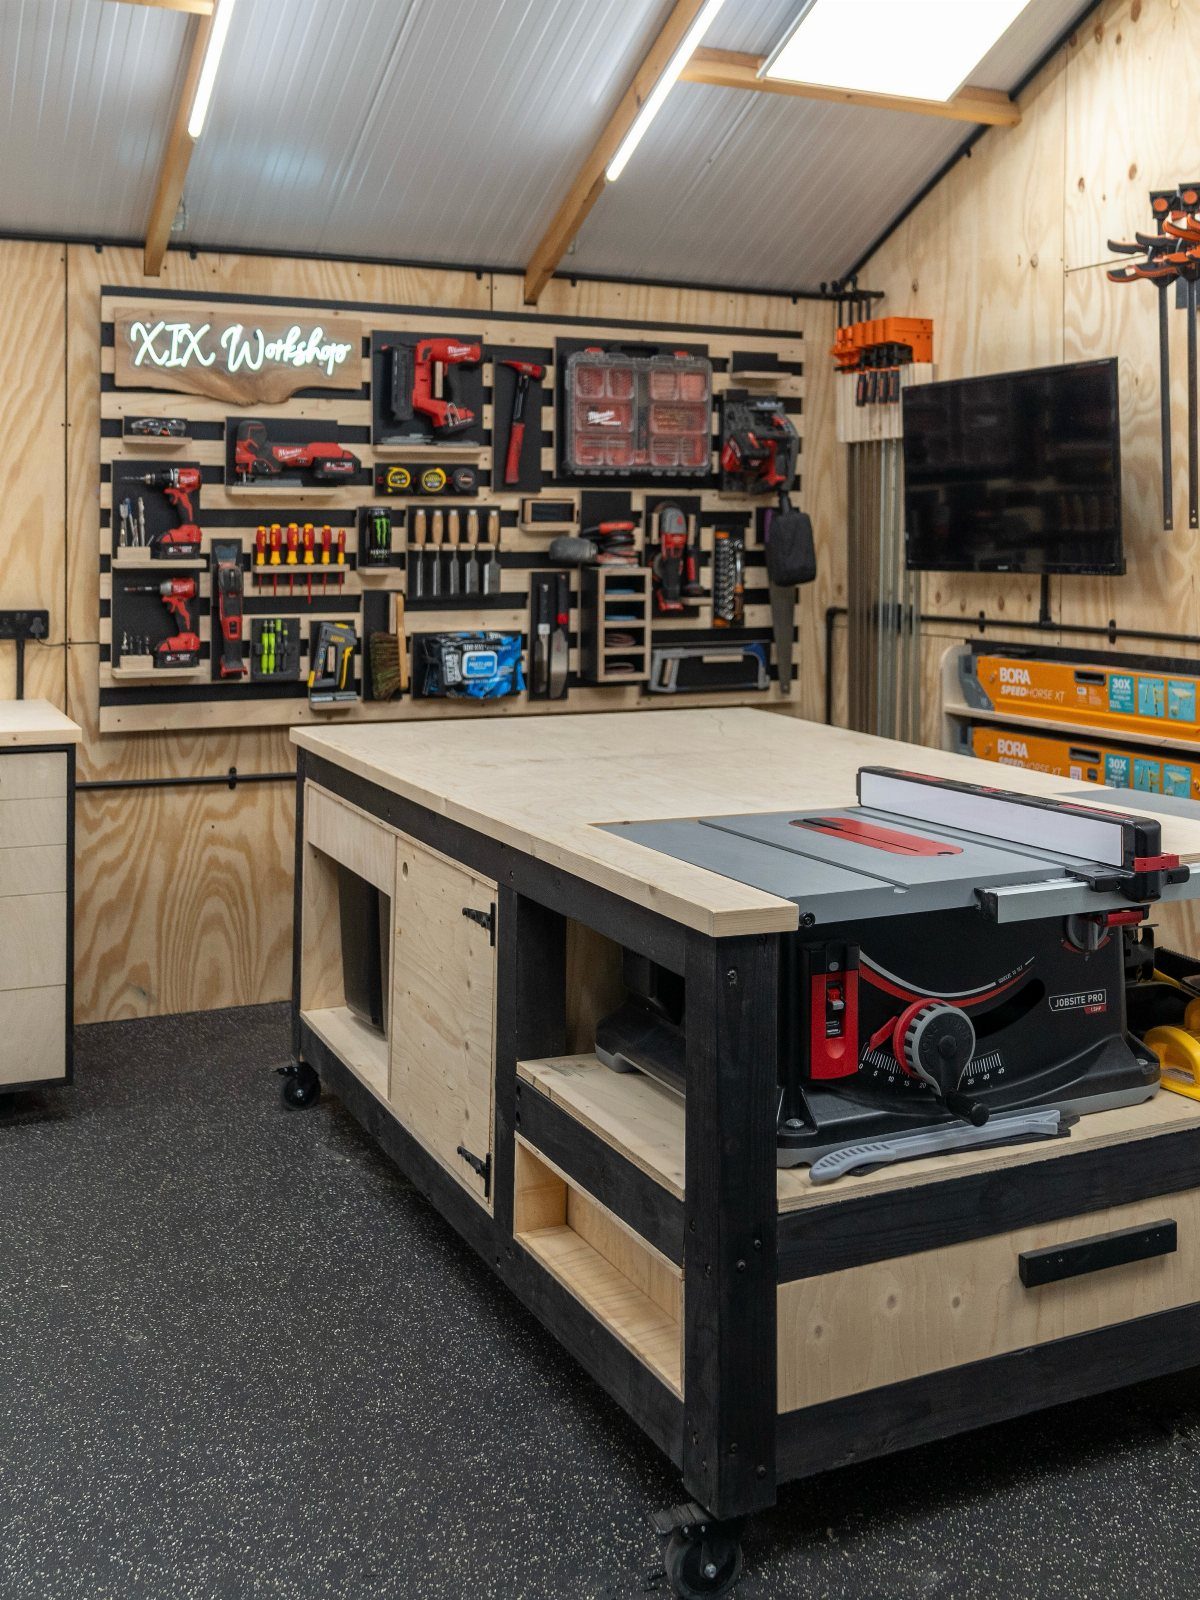
A rolling workbench with a fixed tool mounted on top, like a miter saw, needs locking casters rated for the total weight plus the wood you feed through.
I use locking swivel casters with some meat to them; smaller ones catch on seams and shift mid-cut.
The plywood walls behind this one tell me it’s a shop-built unit, probably 2×4 framing with a ply top thick enough to stay flat under load.
I would add a fold-down outfeed support for long boards, the photo doesn’t show one and that’s where a mobile bench frustrates first.
Build the height to match your tablesaw if you own one, or to a standard bench height if this is your only station.

Plenty Of Storage Space:Rolling workbench with drawers dimension is:37.5"H x 55"W x 19.7"D. With handles dimension is: 37.5"H x 58.3"W x 19.7"D.Designed with 6 drawers (4 narrow + 2 wide) and 2 cabinet doors to provide ample storage space. Each drawer features slides for smooth, quiet gliding and efficient storage of small tools, screws and accessories. Storage cabinet with adjustable shelf provide secure storage for bulky tools or large boxes, keeping your work benches for garage clean and looking good, as well as protecting your privacy.

Robust & Mobile Design:55"W steel rolling workbench combines high-strength steel construction with easy mobility.The reinforced frame can support heavy-duty tools, with a total load capacity of up to 1000 lbs.Workbench with wheels is equipped with 4 heavy-duty rubber wheels, including two lockable swivel wheels for steering and braking, ensuring smooth movement across the floor while maintaining stability during transportation.

【Sturdy and Durable】The overall dimensions of the product are: 24"D x 48"W x 65"H.Made of high-quality cold-rolled steel, the workbench redefines durability with an impressive 2,500 lbs. total weight capacity, and the bottom storage cabinets provide added stability and weight capacity, making this garage workbench a work table with storage that stays stable.
6. Corner Tool Holder
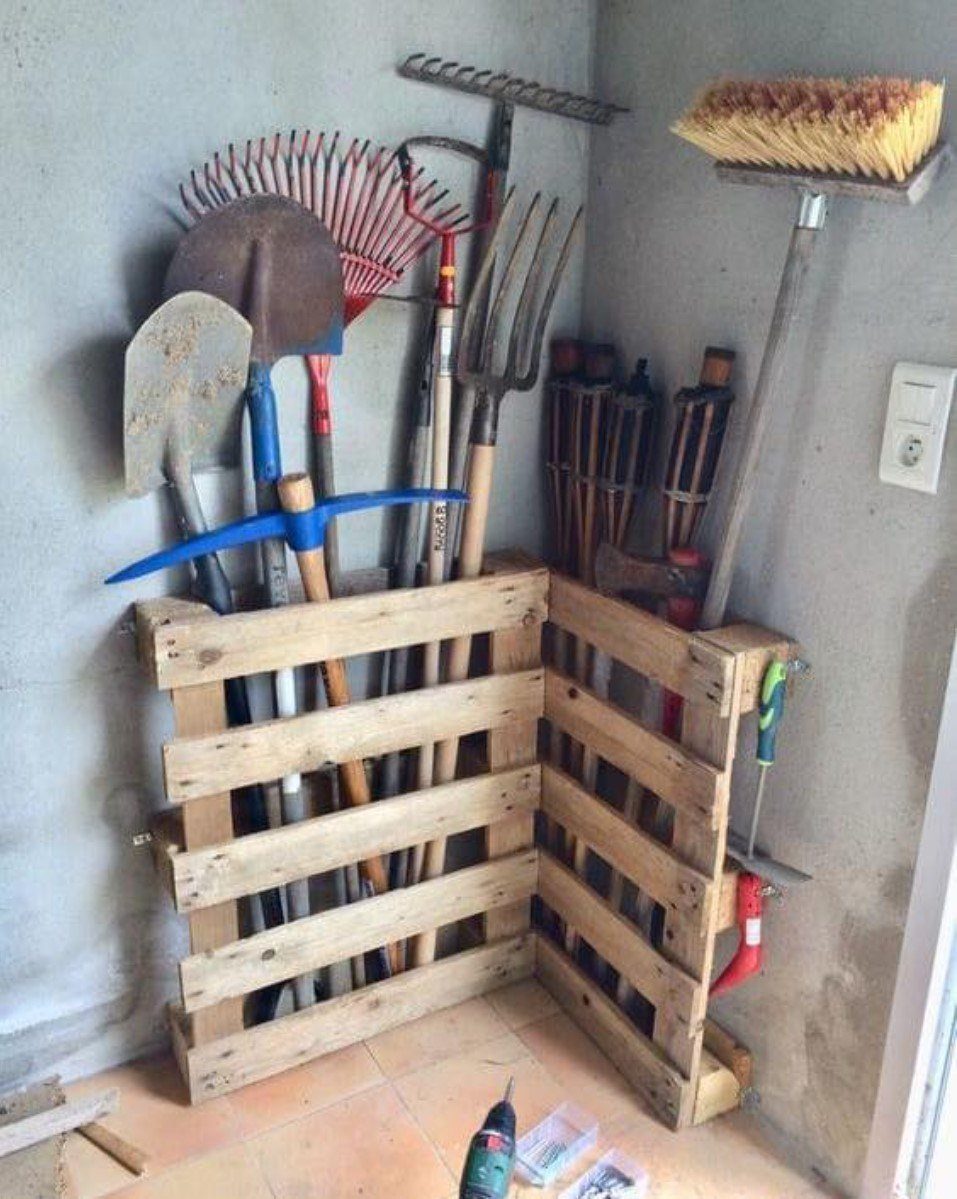
An L-shaped pallet rack in a corner uses the one spot where long tools usually tangle together. Leaving pallet wood rough grips handles better than planed lumber and costs nothing if you source carefully.
The concrete block walls mean they anchored into masonry, not studs, so expansion anchors or tapcon screws are the move there.
I would add a short bungee or strap across the open side; the photo doesn’t show one, but rakes walk out of open cradles when you bump them walking past in a narrow shed.
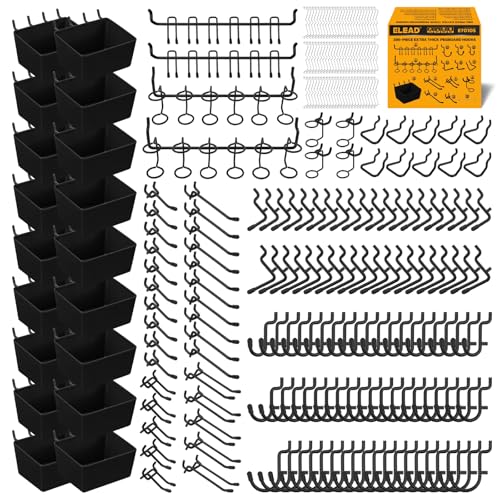
ULTIMATE VALUE PACK – A massive 286-piece bundle featuring 14 versatile hook types and 18 heavy-duty bins. Turn any pegboard wall into a fully equipped, clutter-free storage station—perfect for organizing tools, hardware, and small parts with ease.

Value Package: This peg board organizer kit includes 126 pcs pegboard accessories across 16 assorted styles. You'll get 6 pegboard bins, 52 peg locks, ring tool holders, multi-tool racks, plus an assortment of hooks: curved, angled and straight hooks

EFFICIENT ORGANIZATION - The pegboard set offers a practical solution for various home organization projects, keeping your tools safe, clean, and clutter-free.
7. Tool Drawer Organizers

White pegboard inserts with spring clips let you slot screwdrivers handle-down so blades stay clean and you read sizes at a glance.
Before ordering drawer inserts, I’d measure my own drawer depth; inserts that ride too high won’t clear the drawer front when it closes.
Check whether your drawer slides extend fully. Half-extension hardware leaves the back third unreachable, and that is where small organizers migrate first.

High-Quality Metal Bearing Capacity of 300 Lbs:Our power tool organizer wall mount with charging station is constructed from high-quality and heavy-duty metal materials. The industrial metal has undergone extensive load-bearing tests, allowing it to support up to 330 lbs. You no longer need to worry about the shelf breaking or falling off the wall. Our power tool holders can accommodate power tools of any weight.

🎁 【47.2" H Large Storage Capacity】It can hold your cosmetics like earrings/rings/necklaces/skincare shelves, spacious storage capacity - store all types of jewelry and accessories

【6-Outlet Power Strip】This wall-mounted garage shelf comes with a built-in 6-outlet power strip and a 1.65m cord, making it easy to charge your tools right where they're stored. It keeps your tools ready to go and helps you make the most of your garage workspace.
8. Mason Jar Storage

Screws in glass jars stay visible and sorted, and mounting them under a stair stringer uses dead space that no shelf could fill.
I like the two-piece lid style for sheds; the ring stays fixed, the jar twists free with one hand when your other one is full.
Before you drill, check your stringer is solid, not a decorative trim piece.
Jars full of hardware run heavier than they look. I’d distribute weight across a backer board mounted to two or more stringers if the jars are large.
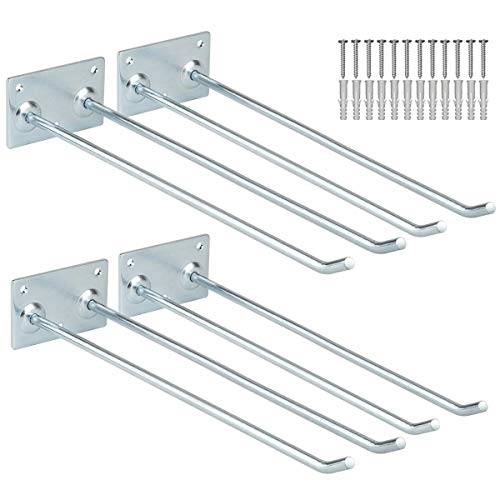
Multi Purpose: 12 inches wall mounted garage storage hooks for organization especially with folding chairs, ladders,hoses, cords, cables, brooms, racquet, rakes, shovels and long-handled garden tools.

💪Material - The mop holder is made of high quality stainless steel, Much strong and sturdy than plastic holder. Build to resist daily scratches, corrosion and tarnishing. Allowing it to remain looking its best for longer.

MULTIPLE STORAGE OPTIONS: Features 5 slots and 6 hooks supporting up to 7.5 pounds per slot, perfect for organizing various cleaning tools efficiently
9. Wooden Slatwall Tool Storage

A shop-built slatwall on OSB gives the same hook flexibility as retail slatwall without the plastic flex that cracks after seasons of hot-cold cycling in a shed.
The wooden slats look like ripped 1x3s with a routered slot; spacing them close enough to catch standard slatwall hooks takes some trial on scrap first.
Cordless tools want their chargers nearby but not buried.
Mount chargers high and store batteries below; that keeps weight low and heat from pooling. Plan one extra slot width per tool, because new models grow.

【Function】 Fengone Overhead Garage Storage Rack Designed for optimal space management. The overhead garage storage racks are perfect for garages or sheds, you can easily access items and maintain a neat and organized storage area
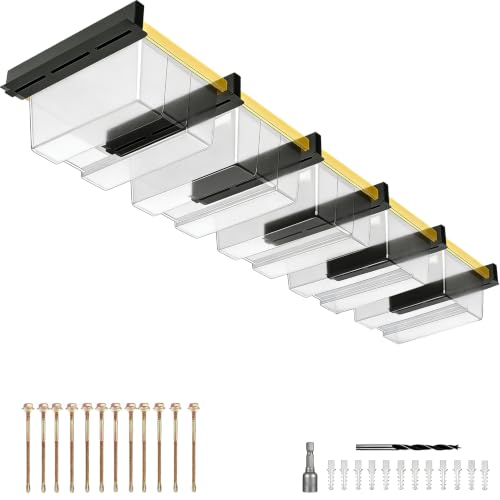
5 Heavy-Duty Sliding Rails – This ceiling storage system includes 5 durable steel rails that mount directly to your garage ceiling joists. Designed to support up to 4 standard plastic storage bins, it transforms unused overhead space into organized, accessible storage.

5-BIN STORAGE CAPACITY: Clear the chaos with our 6-rail kit that creates 5 storage channels. Perfect for organizing large totes in neat rows, making it easy to slide, identify, and retrieve your items whenever needed
10. Wall-Mounted Hardware Bins
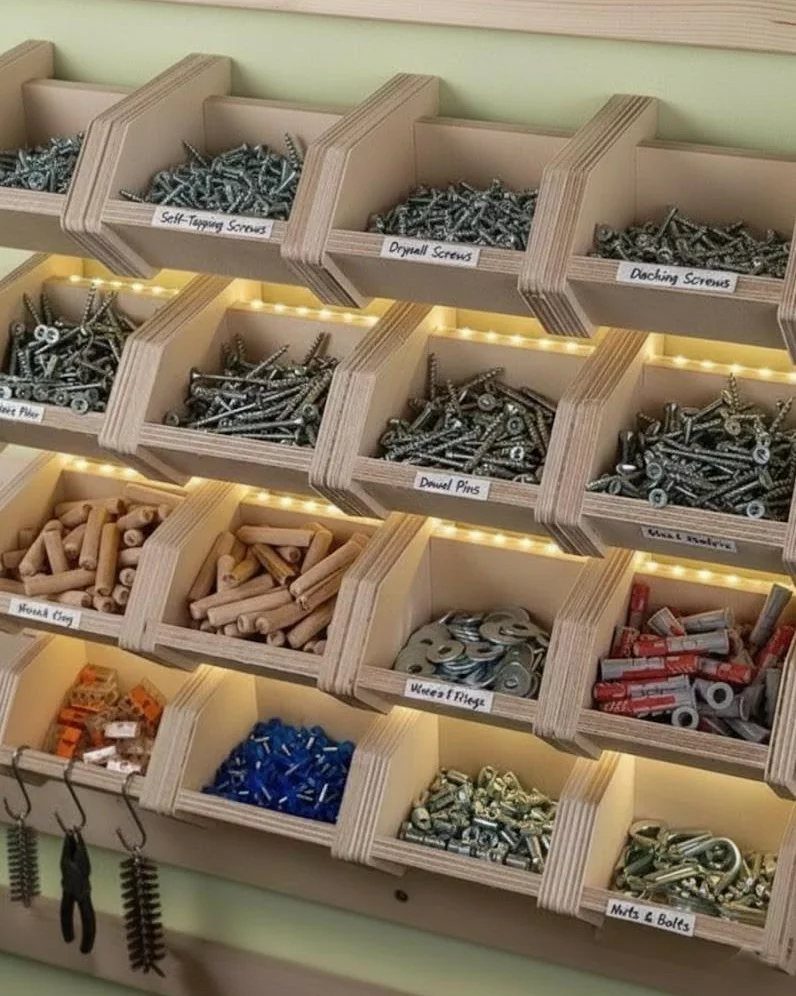
Plywood bins with handwritten labels beat printed ones in a shop because you relabel with a marker when the contents drift, and they always drift.
Under-shelf lighting is a detail I’d copy; hardware sorting happens at arm’s length, and shadowed bins hide the one size you need.
Sort by thread or by job, but pick one system and label honestly.

【Rugged Steel Build】 Thick steel plates with a powder-coated finish form a dependable tool chest that resists rust and daily wear. Ideal for keeping wrenches, sockets, and hand tools organized in any garage or workshop.

Large Storage Capacity: This expansive 72 in tool chest is designed to maximize storage efficiency, featuring a total of 15 drawers (comprising 3 large and 12 small), 3 upper compartments, and a pegboard. This configuration provides ample space to neatly organize a wide variety of tools and accessories, ensuring quick access when you need them most. With this comprehensive tool chest, you can keep your workspace tidy and well-organized, making it ideal for both professional and home use.

【Handle Big Tool Storage】 This set includes 5 pieces plastic organizer bins in XXL size (each 15" x 6" x 1.8"). Each tool chest organizer offers dedicated space for all your essentials. Store larger tools like a framing hammer, pipe wrench, large adjustable wrench, pry bar, and small hacksaw with ease. It also neatly holds frequently-used items such as pliers, wrenches, hex keys, screwdrivers, precision bits, a mini level, scribers, and punches, along with a tape measure and tool belt hook.
11. Crate Storage Tower
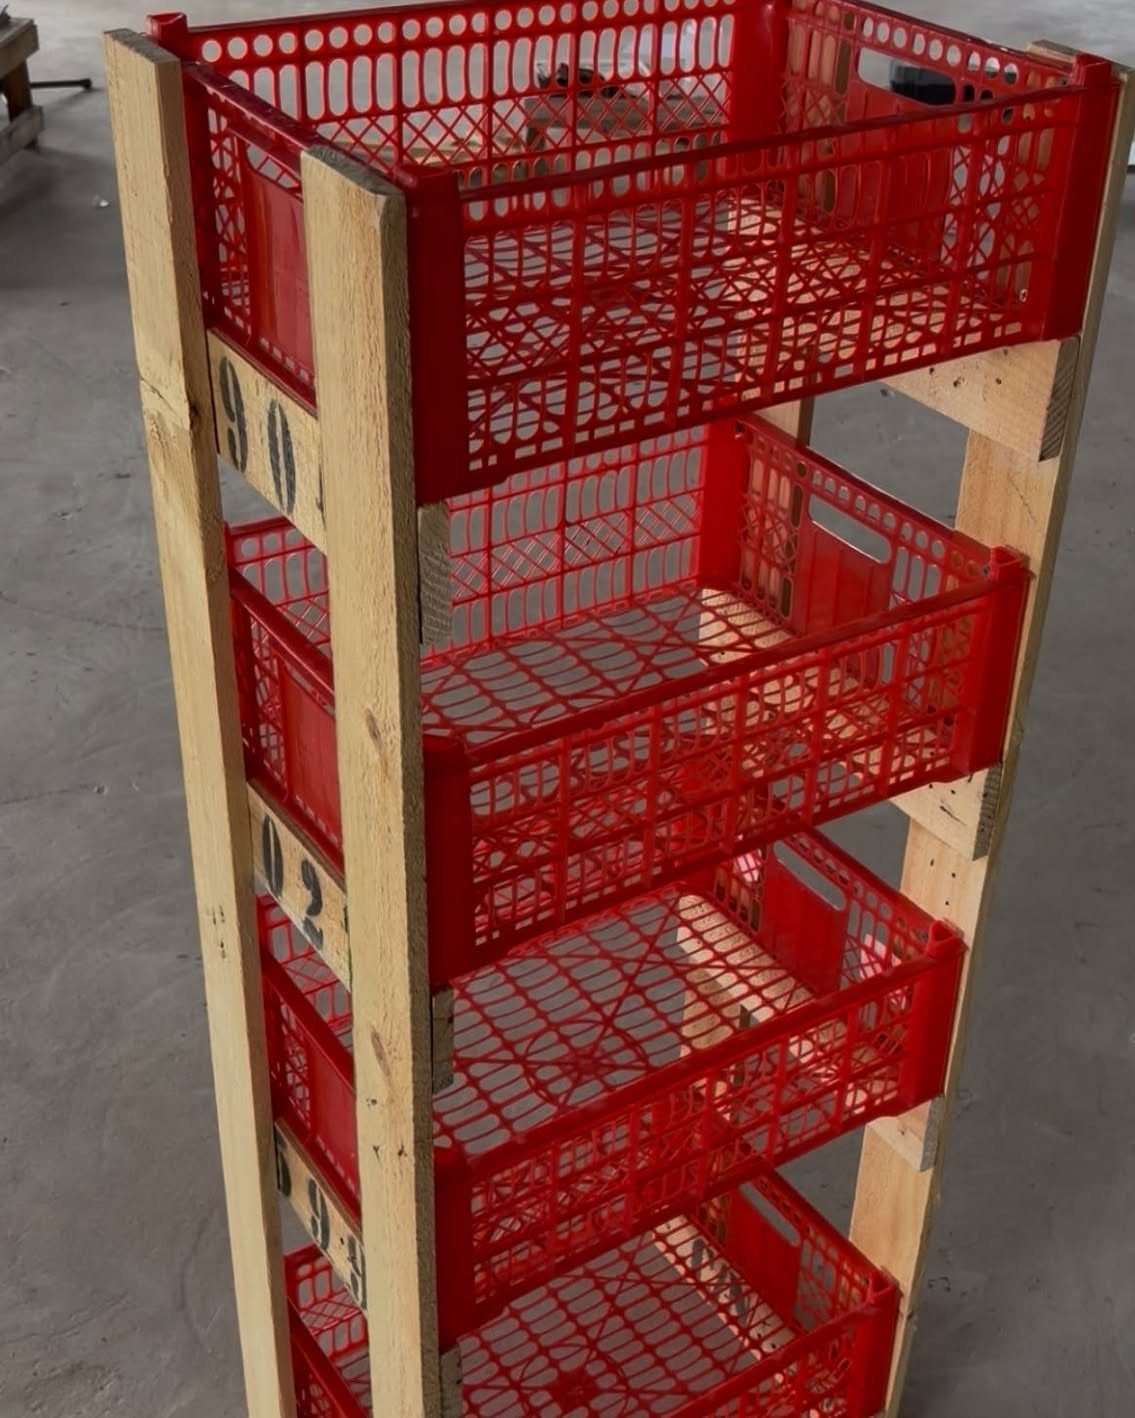
Stacked produce crates in a wooden frame turn vertical floor space into sortable bays for corded tools, camping gear, or project boxes. I’d extend any labeling system from the legs to the crates themselves; unmarked towers become archaeology fast.
Check crate dimensions before you build the frame.
Standard farm crates vary by a half-inch, and a sloppy fit lets them tip when you pull one. I’d leave the front open, no stop board; crates slide easier and you see contents without crouching.
Importance of Organization
An organized shed saves time because every item has a designated place.
I have watched too many Saturday mornings disappear into digging through piles for the right bit or blade. When each tool lives where it belongs, you grab and go.
The appearance matters more than people admit.
A tidy shed reads as cared-for space, and that translates to real estate value in a way a collapsing heap of pots and scrap wood never will. I would not organize purely for resale, but the side effect is there.
Start with a written list of what the shed must do and what problem you are solving. A 12×16-foot shed sounds generous until you try to fit workspace, tool storage, and overflow from a packed garage into it.
Prioritize by function, work the list, and let the losers stay in the garage. That discipline keeps the project from sprawling.
Evaluating Shed Space
Measure your shed before you buy a single bracket. The dimensions decide how much storage you can add and where it goes without blocking doors or work paths.
List every category that lives there now.
Power tools, garden hand tools, lawnmower, seasonal decor, pool gear, the household overflow that drifted in. Most sheds become catch-alls, and pretending otherwise builds organization around half the real inventory.
Walk the space and note where piles form.
Equally useful: notice what already works. If your cordless drill chargers sit fine on a current shelf, leave that system alone and spend effort where tools go missing or fall over.
I check stud or masonry locations early.
A wall plan that assumes standard 16-inch spacing hits trouble in sheds with off-frame construction or block walls. That discovery changes whether you use direct-mounted brackets or a horizontal backer board.
Safety Considerations
Keep chemicals in original containers.
The label tells you shelf life, proper use, and emergency steps if something goes wrong. Decanting into generic bottles loses all of that, and I have seen it cost people time they did not have.
Sunlight heats plastic bins enough to warp lids and degrade contents over time, so I tuck chemical storage into a shaded corner or behind an opaque cabinet.
Heat buildup in a closed shed turns a forgotten jug into a fire hazard faster than most owners realize. A shaded low shelf or cabinet, not a windowsill ledge, is the move here.
I separate flammables from anything that sparks. Gas and oil live on the lower shelves I mentioned for long-handled tools, but not in the same breath as battery chargers or power strips.
Heat pools upward; weight stays low; chemicals stay cool and shaded. That three-way rule has kept my shed arrangements safe through hot summers.
Frequently Asked Questions
What is the best way to store tools in a shed?
Wall-mounted storage wins in most sheds because floor space disappears fast.
I like pegboards for hand tools you grab often, angled brackets for long-handled garden tools, and custom wooden shelves where each power tool gets its own slot so you reach without looking.
Overhead rails with sliding totes handle the seasonal stuff that otherwise clutters every corner.
What items should never be stored in a shed?
Flammables and spark sources need real separation; gas, oil, and solvents stay well apart from battery chargers, power strips, or anything that throws a hot contact.
I never decant chemicals into unmarked bottles. The original label carries shelf life, hazard warnings, and first-aid steps you cannot guess at when you need them fast.